Your RV water pump is usually loud because its normal vibration is transferring into the floor, cabinetry, walls, or rigid water lines. Trapped air, a clogged inlet strainer, loose mounting hardware, low tank water, restricted plumbing, or worn internal parts can make the sound noticeably worse.
In this guide, I’ll help you identify the type of noise you’re hearing, find its source, and work through the most effective fixes before you consider replacing the pump.
Key Takeaways
- A steady humming or pulsing sound during water use is usually normal.
- Loud rattling often comes from the pump or PEX pipes touching hard surfaces.
- Trapped air can make the pump pulse roughly and cause faucets to sputter.
- A clogged inlet strainer can restrict water and make the pump growl.
- Rubber mounts and flexible hoses usually provide the greatest noise reduction.
- Rapid cycling may come from low-flow use, restrictions, or incorrect pressure settings.
- Grinding, squealing, overheating, and weak pressure may indicate pump damage.
- Random cycling with every faucet closed can point to a leak or faulty check valve.
Is It Normal for an RV Water Pump to Be Loud?
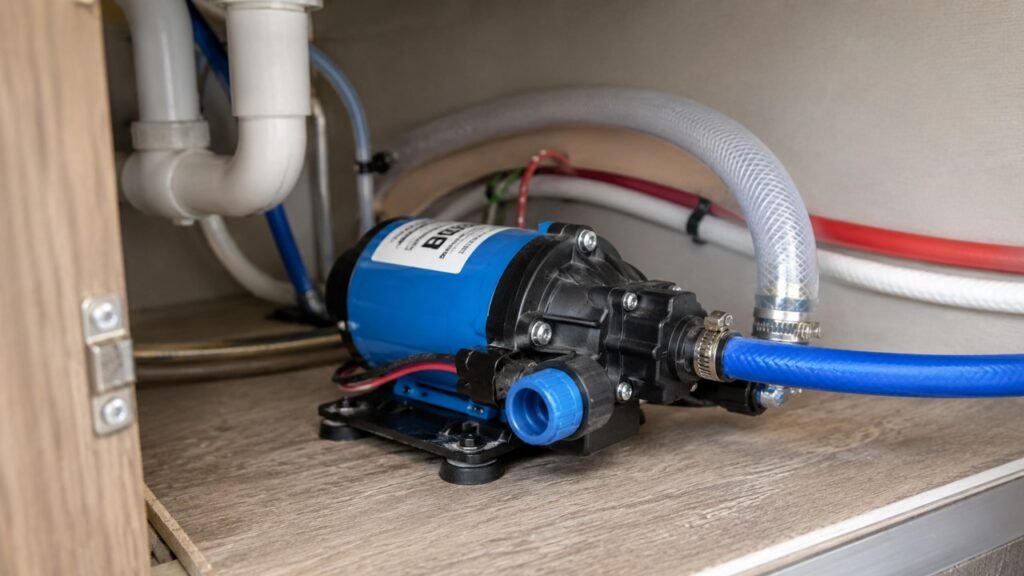
Some RV water pump noise is completely normal. Most RVs use a small 12-volt diaphragm pump that switches on whenever water pressure drops. Because the pump moves water in pulses rather than as one perfectly smooth stream, you will usually hear a steady hum, buzz, or rhythmic vibration while a faucet is open.
The problem is that the pump rarely operates in isolation. It is mounted inside a cabinet, storage compartment, under a bed, or against a thin plywood floor. Those surrounding surfaces can amplify the pump’s vibration like the body of a speaker.
A pump that sounds reasonable when held in your hand may seem much louder after being attached to a large cabinet panel.
You should pay more attention when the sound suddenly changes or includes:
- Hard knocking.
- Metallic grinding.
- High-pitched squealing.
- Rapid on-and-off cycling.
- Loud rattling from inside a wall.
- Uneven growling accompanied by weak water pressure.
- Pump operation when no fixture is open.
A pump that has always produced a predictable hum may simply be naturally noisy. A pump that suddenly becomes louder, rougher, or less consistent deserves a closer inspection.
What Does the Sound From Your RV Water Pump Mean?
The type of sound you hear can help narrow down the cause. Listen carefully while someone opens a faucet, changes the flow, and closes it again.
| Pump sound | Most likely cause | What else you may notice | First thing to check |
| Loud humming or buzzing | Vibration transferring into the floor or wall | Water flow remains normal | Pump mounting surface |
| Rattling | Loose screws, pipes, fittings, or nearby objects | Noise changes when you touch a pipe | Mounts and pipe contact points |
| Knocking or hammering | Rapid cycling, rigid PEX, or restricted flow | Pump switches on and off repeatedly | Faucet flow and plumbing restrictions |
| Sputtering with loud pulsing | Air trapped in the system | Bursts of air from faucets | Bleed the plumbing lines |
| Growling or rough vibration | Clogged strainer or restricted inlet | Reduced or uneven water flow | Pump inlet filter |
| High-pitched squeal | Worn motor bearings or internal wear | Pump may feel unusually hot | Pump age and motor condition |
| Grinding | Debris or internal pump damage | Poor pressure or leaking pump head | Pump valves and internal parts |
| Noise with faucets closed | Leak, faulty check valve, or pressure loss | Pump cycles randomly | Faucets, toilet, fittings, and pump valves |
The sound table is a starting point rather than a perfect diagnosis. Two problems can sometimes create similar noises, so work through the simple checks before replacing parts.
Why Is My RV Water Pump So Loud?
A loud RV water pump is often a vibration problem rather than a failed pump. The motor may be operating normally, but the mounting surface and plumbing system are spreading its noise throughout the RV.
The Pump Is Mounted Directly to a Hard Surface
Many RV water pumps are screwed directly to thin plywood, a cabinet base, or a compartment wall. Every time the motor runs, its vibration transfers into that surface.
The panel then acts like a drum and makes the pump sound much louder than it actually is.
Most pumps have rubber feet or grommets, but these parts cannot isolate vibration properly when:
- The rubber has hardened with age.
- A mounting foot is missing or damaged.
- The screws are overtightened.
- The pump housing touches a nearby wall.
- The mounting surface flexes while the pump runs.
- The pump is mounted vertically when its instructions require another position.
You can often confirm this problem by placing your hand lightly on the mounting panel while the pump operates. If the panel is vibrating strongly, it is contributing to the noise.
Do not grab the pump, wiring, or fittings while it is operating. Simply observe the surrounding surface from a safe position.
Rigid PEX Pipes Are Carrying the Vibration
Rigid PEX is durable and widely used in RV plumbing, but it can transmit pump vibration over a surprising distance.
When rigid PEX connects directly to the inlet and outlet ports, every pulse travels down the water line. That vibration may continue into cabinets, walls, floors, and fixtures.
The pump might be under the bed, yet the noise may seem to come from the kitchen cabinet or bathroom wall.
This is why flexible hoses near the pump are so effective. They create a softer connection between the pump and the main plumbing system, reducing the amount of vibration that enters the PEX.
Water Lines Are Rattling Against the RV
Water lines are often routed through tight spaces during RV construction. In some areas, a pipe may rest directly against:
- A cabinet panel.
- A metal frame.
- Another water line.
- A tank.
- A floor opening.
- A wall penetration.
- A wiring cover.
- A loose piece of trim.
When the pump starts, the line moves slightly and taps against that surface. A small tapping sound near the pump can become a loud rattle farther away.
Try changing the faucet flow while listening. If the rattling changes with the pump’s cycling pattern, a loose pipe is a likely cause.
Air Is Trapped in the Water Lines
Air inside the plumbing system interrupts smooth water flow. The pump may run unevenly, sound rougher, and cause water to spit or sputter from faucets.
Trapped air is especially common after:
- Refilling an empty freshwater tank.
- Running the freshwater tank too low.
- Winterizing or de-winterizing.
- Replacing a water filter.
- Disconnecting plumbing lines.
- Servicing the water heater.
- Repairing the water pump.
- Allowing the pump to lose prime.
If you hear loud pulsing and see bursts of air at a faucet, bleeding the system should be one of your first steps.
The Pump Inlet Strainer Is Clogged
Many RV pumps have a small mesh strainer installed on the inlet side. Its job is to catch sediment, plastic shavings, tank residue, and other debris before they enter the pump.
As the strainer becomes clogged, the pump receives less water. It may begin to growl, pulse harder, run longer, or provide weak pressure.
This condition is sometimes described as the pump being starved for water.
A dirty strainer can also make it harder for the pump to prime. Fortunately, it is usually easy to inspect and clean.
The Freshwater Tank Is Low or Empty
A low freshwater tank can allow the pump to draw air instead of a steady supply of water. This may produce loud pulsing, sputtering, and inconsistent pressure.
The issue can be worse when the RV is parked on a slope. Water may move away from the tank outlet even though the level display still shows some remaining water.
Tank level sensors are not always accurate, especially when residue collects on them. If the pump suddenly becomes noisy, physically confirm that the tank contains enough water.
Avoid letting the pump run dry for extended periods. Some models tolerate brief dry running, but continued operation without water can cause overheating and unnecessary wear.
A Hose Is Kinked or a Valve Is Partially Closed
Any restriction between the freshwater tank and pump can make the pump work harder.
Possible restrictions include:
- A kinked flexible inlet hose.
- Crushed or pinched tubing.
- A partially closed shutoff valve.
- A winterization valve left in the wrong position.
- Debris in the tank outlet.
- A collapsed suction hose.
- A blocked filter.
- An incorrectly installed check valve.
Restrictions on the outlet side can also lead to rapid cycling, hammering, or excessive pressure buildup.
Always check valve positions after winterizing, sanitizing, repairing plumbing, or using an antifreeze suction line.
The Pump Mounting Screws Are Loose or Too Tight
Mounting screws need to hold the pump securely without crushing its rubber feet.
Loose screws allow the pump to bounce or shift against the mounting surface. Overtightened screws compress the rubber mounts until they no longer absorb vibration.
The correct tension is usually firm enough to prevent movement while still allowing the rubber feet to remain slightly flexible.
Do not assume tighter is always better. Follow the installation instructions for your specific pump whenever possible.
The Pump Is Rapidly Cycling or Hammering
A fixed-speed pump is either running or off. When you open a faucet only slightly, the pump may quickly reach its shutoff pressure, turn off, sense another pressure drop, and turn on again.
This repeated switching can sound like hammering.
Rapid cycling may also be caused by:
- A clogged faucet aerator.
- A restricted showerhead.
- Undersized plumbing.
- Excessive bends or fittings.
- Incorrect pressure switch adjustment.
- Incorrect bypass adjustment.
- A faulty pressure switch.
- An improperly sized pump.
- A small leak.
- A partially closed valve.
An accumulator tank may help with low-flow cycling, but it should not be used to hide a restriction, leak, or incorrectly adjusted pump.
The Pump Is Working Harder Than It Should
The pump may become louder when it must pull water through a long, narrow, or restricted inlet line.
Installation factors that increase pump workload include:
- Excessive distance from the freshwater tank.
- Too many elbows or fittings.
- Small-diameter tubing.
- A dirty water filter.
- A blocked tank vent.
- A restrictive fixture.
- An undersized inlet line.
- Poor electrical voltage.
If the pump has always been loud, the original installation may be contributing to the problem.
The Pump Is Worn or Damaged
A pump that becomes louder after years of service may have worn internal parts.
Possible problems include:
- Worn motor bearings.
- Damaged diaphragm material.
- Debris inside the valve assembly.
- A failing pressure switch.
- Hardened internal seals.
- A cracked pump head.
- Loose internal components.
- Motor damage caused by low voltage or overheating.
Age alone does not prove the pump has failed. Evaluate the noise together with flow, pressure, temperature, leaks, cycling behavior, and electrical condition.
How to Quiet a Loud RV Water Pump
Begin with the easiest and least expensive checks. Many noisy pumps can be improved without replacing plumbing or buying a new unit.
1. Inspect the Pump While It Is Running
Locate the pump and clear away any stored items that may block your view.
Ask another person to:
- Open a faucet fully.
- Reduce the water to a trickle.
- Open a second fixture.
- Close all fixtures.
- Flush the toilet.
Observe how the pump and surrounding pipes react.
Look for:
- Visible pump movement.
- Mounting feet lifting or shifting.
- Pipes tapping nearby surfaces.
- Loose fittings.
- Water leaks.
- Wires touching the motor.
- Storage items vibrating against the compartment.
- A panel flexing under the pump.
Sometimes the noise comes from a tool, hose, panel, or container sitting beside the pump rather than the pump itself.
Keep your fingers away from exposed wiring, leaking electrical connections, and moving components during the inspection.
2. Bleed Air From the Plumbing System
Bleeding the lines can resolve rough pulsing, sputtering, and loud operation after the system has been emptied.
Use this process:
- Add enough water to the freshwater tank.
- Confirm the winterization and tank valves are correctly positioned.
- Turn on the water pump.
- Open the cold-water faucet farthest from the pump.
- Let it run until the flow becomes steady.
- Repeat the process at every cold-water fixture.
- Open each hot-water fixture and let the air escape.
- Flush the toilet.
- Run the shower.
- Check any outdoor shower or exterior faucet.
- Close the fixtures and listen for normal pump shutoff.
Make sure the water heater is full and configured correctly before operating it normally. Never energize an empty electric water-heater element.
You may need to repeat the process if the pump recently lost prime or the system contains a large amount of air.
3. Clean the Pump Inlet Strainer
Before opening the strainer, turn off the pump and disconnect city water.
Then:
- Open a faucet to relieve pressure.
- Place a towel or shallow container beneath the pump.
- Locate the clear strainer bowl on the inlet side.
- Unscrew the bowl or cap carefully.
- Remove the mesh screen.
- Rinse away sediment and debris.
- Inspect the screen for damage.
- Check the O-ring for cracks, flattening, or dirt.
- Reassemble the strainer securely.
- Turn the pump back on.
- Inspect the housing for leaks.
Do not overtighten a plastic strainer bowl. Excessive force can crack the housing or damage its threads.
If the screen repeatedly fills with plastic shavings or tank debris, the freshwater tank may need to be flushed more thoroughly.
4. Check the Freshwater Tank and Inlet Hose
Confirm that the pump has a reliable water supply.
Check:
- The actual tank level.
- The tank outlet.
- The tank vent.
- The inlet hose.
- Every valve between the tank and pump.
- Winterization bypass valves.
- Loose hose clamps.
- Cracked suction tubing.
- Kinks behind panels.
- Air leaks around threaded fittings.
A suction-side fitting can draw air without visibly leaking water. This makes diagnosis more difficult because you may hear rough pump operation without finding a puddle.
Look for bubbles in any clear inlet section and inspect threaded connections carefully.
5. Reposition the Pump
A pump should not touch walls, cabinet panels, tanks, wiring covers, or nearby plumbing.
Even a small contact point can transmit vibration.
When space allows:
- Move the pump slightly away from surrounding panels.
- Re-route wiring that touches the motor housing.
- Create clearance around fittings.
- Remove stored objects leaning against the pump.
- Avoid forcing PEX pipes sideways into the pump ports.
Do not suspend the pump loosely or leave it unsupported. It must remain securely mounted and accessible for maintenance.
6. Install Rubber Vibration-Isolation Mounts
Replacing worn rubber feet or adding proper isolation material can noticeably reduce noise.
Suitable materials may include:
- Rubber mounting grommets.
- Neoprene pads.
- Manufacturer-approved rubber feet.
- Dense closed-cell foam.
- A rigid mounting board installed over a rubber pad.
One practical approach is to mount the pump on a small piece of plywood or composite board, then isolate that board from the RV floor with rubber or dense closed-cell material.
The platform must remain stable. Soft household foam that allows the pump to rock is not a good choice.
Avoid blocking airflow around the motor or creating a surface that absorbs water.
7. Adjust the Mounting Screws
Inspect each mounting foot before tightening anything.
If the screws are loose, tighten them gradually until the pump no longer shifts.
If the rubber feet are fully compressed, loosen the screws slightly while keeping the pump secure.
You are trying to balance two needs:
- The pump must not bounce or slide.
- The rubber must remain flexible enough to absorb vibration.
Do not enlarge the mounting holes or substitute unsuitable hardware unless required by the manufacturer’s instructions.
8. Add Flexible Hoses at the Pump
Direct connections from the pump to rigid PEX often transmit the most vibration.
Installing short flexible potable-water hoses on the inlet and outlet sides can break that vibration path.
Use hoses and fittings rated for:
- Drinking water.
- The pump’s pressure.
- The expected water temperature.
- The correct thread type.
- The available installation space.
The flexible sections should form gentle curves rather than sharp bends. Do not kink the hose or place side pressure on the pump ports.
The exact hose length depends on the pump, compartment, and plumbing layout. The goal is to provide flexibility without creating long, unsupported loops.
Turn off the pump, drain pressure, and check every new fitting for leaks after installation.
9. Insulate and Secure the Water Lines
Follow the pipes away from the pump and look for contact points.
Common solutions include:
- Closed-cell foam pipe insulation.
- Rubber-lined pipe clamps.
- Foam around wall penetrations.
- Soft separators between crossing pipes.
- Cushioned supports beneath loose PEX.
- Repositioning a line away from cabinet panels.
Split foam tubing can be installed around a pipe where it passes through a floor or wall.
You may also use small pieces of closed-cell foam between the pipe and nearby surfaces. Secure the material so it cannot slide away.
Avoid clamps that crush or deform PEX. Pipes also need a small amount of movement for temperature changes.
10. Clean Faucet Aerators and Showerheads
Restrictions at fixtures can make a fixed-speed pump cycle repeatedly.
Remove and inspect:
- Faucet aerators.
- Showerhead screens.
- Flow restrictors.
- Outdoor shower fittings.
- Toilet water inlets.
Sediment, mineral deposits, plastic shavings, and filter debris can collect in these small openings.
Rinse removable screens and soak mineral-coated parts in a suitable cleaning solution when allowed by the fixture manufacturer.
After cleaning, run the pump again at low and full flow to see whether the cycling improves.
11. Check for Plumbing Leaks
A pump that activates when no water is being used is responding to a loss of pressure.
Inspect:
- Kitchen and bathroom faucets.
- Shower valves.
- The toilet valve.
- The outdoor shower.
- Low-point drains.
- Water-heater fittings.
- Filter housings.
- PEX connections.
- Pump fittings.
- The pump check valve.
- Hidden plumbing behind cabinets.
Dry each fitting and place a clean paper towel beneath it. Even a small amount of moisture will be easier to see against the paper.
A leak may also be internal to the pump. A worn check valve or diaphragm can allow pressure to fall without creating an external puddle.
12. Test the Electrical Supply
A 12-volt water pump depends on stable voltage and solid electrical connections.
Low voltage may cause:
- Slow motor speed.
- Rough operation.
- Increased current draw.
- Excessive heat.
- Weak water pressure.
- Unusual buzzing.
- Failure to reach shutoff pressure.
Inspect the battery state, fuse, ground connection, terminals, switches, and visible wiring.
Look for:
- Corrosion.
- Loose terminals.
- Undersized wiring.
- Burned connectors.
- Damaged insulation.
- Poor ground connections.
- Voltage drop over a long wire run.
Compare the voltage at the pump with the manufacturer’s requirements while the pump is operating.
Electrical diagnosis can be hazardous when wiring is damaged or wet. Contact a qualified RV technician if you are not comfortable testing 12-volt circuits.
Which Fixes Make the Biggest Difference?
Some repairs reduce the vibration at its source, while others prevent the RV structure from amplifying it. The most effective solution often combines two or three improvements.
| Fix | Best for | Difficulty | Expected noise reduction |
| Bleeding the water lines | Sputtering and uneven pulsing | Easy | Low to moderate |
| Cleaning the inlet strainer | Growling and weak flow | Easy | Moderate |
| Adjusting mounting screws | Loose or over-compressed mounts | Easy | Moderate |
| Adding rubber isolation mounts | Floor and cabinet vibration | Easy to moderate | High |
| Installing flexible pump hoses | Vibration traveling through PEX | Moderate | High |
| Insulating and securing pipes | Rattling water lines | Moderate | Moderate to high |
| Cleaning restricted fixtures | Rapid cycling at faucets | Easy | Moderate |
| Adding an accumulator tank | Low-flow cycling and pulsation | Moderate | Moderate |
| Replacing a worn pump | Grinding, squealing, or poor pressure | Moderate | High |
If the pump works correctly but sounds loud throughout the RV, rubber isolation mounts and flexible hoses are usually the most useful upgrades.
If the pump sounds rough and water flow is weak, begin with the tank level, inlet hose, strainer, air bleeding, and electrical supply.
Should You Install an RV Accumulator Tank?
An accumulator tank stores a small amount of pressurized water inside a chamber separated by an internal bladder. When you briefly open a faucet, the stored pressure can provide water before the pump needs to switch on.
This can make the plumbing feel smoother and reduce pump cycling during low-flow use.
An accumulator tank may help:
- Reduce rapid on-and-off cycling.
- Smooth pulsing at a faucet.
- Provide a short burst of water without starting the pump.
- Reduce pressure fluctuations.
- Make nighttime handwashing less disruptive.
- Reduce stress caused by frequent short pump cycles.
However, an accumulator tank is not a universal fix for a loud pump.
It will not correct:
- A loose mounting board.
- Worn rubber feet.
- Pipes rattling against cabinets.
- A clogged strainer.
- A kinked hose.
- Air entering the inlet line.
- A failing motor bearing.
- A leaking plumbing fitting.
- Low electrical voltage.
You should also confirm compatibility before adding one. Some variable-speed pumps are designed to manage flow without an accumulator. Certain bypass-style pumps may require specific setup or may not benefit significantly from a tank.
Installation usually involves connecting the tank to the pressurized side of the plumbing system and setting its air pre-charge correctly. An incorrect pressure setting can reduce its effectiveness.
Review the pump and accumulator manufacturers’ instructions before installation.
Can You Build a Soundproof Box Around an RV Water Pump?
A sound-dampening enclosure can reduce airborne noise, but it should be considered only after you have addressed mounting vibration and rattling pipes.
A safe enclosure should:
- Leave ventilation space around the motor.
- Use moisture-resistant closed-cell material.
- Keep foam away from hot electrical components.
- Allow access to the inlet strainer.
- Provide room to inspect fittings for leaks.
- Avoid touching the pump housing.
- Avoid pressing against flexible hoses.
- Remain removable for maintenance.
- Follow the pump manufacturer’s clearance requirements.
- Prevent water from becoming trapped around the pump.
Do not wrap the pump tightly in foam or place it inside a sealed container. The motor needs to release heat, and a hidden leak must remain visible.
In many RVs, a better solution is to line nearby cabinet panels with suitable sound-dampening material while leaving the pump itself open and ventilated.
A quiet box may reduce the sound you hear, but flexible hoses and vibration mounts are more effective because they address the source of the noise.
When Is a Loud RV Water Pump a Sign of a Bigger Problem?
A sudden change in sound is more concerning than a pump that has always produced a steady hum. Watch for symptoms that suggest internal damage, an electrical fault, or a serious plumbing problem.
Warning signs include:
- Metallic grinding or screeching.
- A high-pitched squeal that gets worse.
- An unusually hot pump housing.
- A burning smell.
- Melted or discolored wiring.
- Repeatedly blown fuses.
- Water leaking from the pump head.
- Significantly reduced pressure.
- Failure to draw water from a full tank.
- Continuous operation after all faucets are closed.
- Random cycling every few seconds.
- Severe vibration after the plumbing has been bled.
- Noise that continues after the inlet strainer is cleaned.
- Cracks in the pump housing.
- Water appearing near electrical wiring.
Turn the pump off immediately if you smell burning, find damaged wiring, or see water reaching electrical components.
Continued operation can cause additional damage and may create a fire or flooding risk.
Should You Repair or Replace a Noisy RV Water Pump?
Repair makes sense when the source of the noise is accessible and the pump still produces reliable pressure. Replacement becomes more practical when the motor or housing is damaged.
Repair the Pump When
Repair or maintenance may be worthwhile when:
- The inlet strainer is clogged.
- A hose is kinked.
- A fitting is drawing air.
- Mounting screws need adjustment.
- The rubber feet are damaged.
- A compatible valve kit is available.
- A replaceable pressure switch has failed.
- Debris is lodged in the valve assembly.
- The pump is relatively new.
- The motor still sounds smooth.
- Water pressure remains consistent.
- Replacement parts cost much less than a new pump.
Always use parts designed for the exact pump model. Similar-looking valve assemblies and switches may have different pressure ratings or internal designs.
Replace the Pump When
Replacement may be the better choice when:
- The motor bearings grind or squeal.
- The housing is cracked.
- The motor repeatedly overheats.
- The pump has internal electrical damage.
- The pump leaks after replacing seals.
- Pressure remains weak after clearing restrictions.
- The unit repeatedly loses prime.
- Repair parts are unavailable.
- Repair costs approach the price of a new pump.
- The existing pump is incorrectly sized.
- The pump has suffered freeze damage.
- The motor repeatedly blows a correctly sized fuse.
A replacement pump may still be noisy if you install it against the same hard surface and connect it directly to rigid PEX. Correct the mounting and plumbing layout during replacement.
What to Check Before Buying a Replacement
Compare the following specifications:
- Supply voltage.
- Maximum flow rate.
- Shutoff pressure.
- Operating pressure.
- Current draw.
- Fuse requirement.
- Inlet and outlet fitting size.
- Port orientation.
- Physical dimensions.
- Mounting position.
- Self-priming capability.
- Dry-run rating.
- Fixed-speed or variable-speed operation.
- Compatibility with an accumulator tank.
- Noise rating, when provided.
- Compatibility with the RV’s plumbing pressure limits.
Do not automatically install the highest-pressure pump you can find. Excessive pressure can stress fixtures, filters, fittings, water-heater components, and older PEX connections.
How to Prevent Your RV Water Pump From Becoming Noisy
Preventive care reduces restrictions, air leaks, vibration, and premature internal wear.
Use these maintenance habits:
- Clean the pump inlet strainer regularly.
- Inspect the strainer O-ring before reassembly.
- Keep enough water in the freshwater tank.
- Avoid prolonged dry running.
- Sanitize the freshwater system as recommended.
- Flush sediment from the tank.
- Use potable-water hoses when filling.
- Filter questionable campground water before it enters the tank.
- Winterize the pump before freezing weather.
- Inspect flexible hoses for cracking or hardening.
- Check rubber mounting feet periodically.
- Keep mounting screws secure without overtightening them.
- Support loose PEX with cushioned clamps.
- Inspect pipe penetrations for rubbing.
- Keep the pump compartment dry.
- Maintain ventilation around the motor.
- Investigate new sounds promptly.
- Turn the pump off when leaving the RV for an extended period.
- Turn it off when the freshwater tank is empty.
- Do not run the pump unnecessarily while connected to pressurized city water.
A quick inspection at the start of each camping season can prevent many noise problems.
RV Water Pump Noise Troubleshooting Checklist
Use this checklist to work from the simplest cause toward more involved repairs:
- Confirm that the freshwater tank contains enough water.
- Make sure the RV is not parked at an extreme angle.
- Verify that all winterization valves are correctly positioned.
- Open a faucet fully and listen to the pump.
- Reduce the faucet flow and check for rapid cycling.
- Bleed air from every cold-water outlet.
- Bleed air from every hot-water outlet.
- Flush the toilet and run the shower.
- Clean the pump inlet strainer.
- Inspect the strainer O-ring.
- Check the inlet hose for kinks.
- Look for loose suction-side fittings.
- Confirm that the pump is not touching a wall.
- Inspect the rubber mounting feet.
- Adjust loose or overtightened mounting screws.
- Look for PEX pipes touching cabinets or framing.
- Add foam at pipe contact points.
- Secure loose plumbing with cushioned clamps.
- Clean faucet aerators and shower screens.
- Check the system for leaks.
- Inspect the toilet valve and outdoor shower.
- Test battery voltage under load.
- Inspect wiring and ground connections.
- Add flexible hoses near the pump if needed.
- Consider an accumulator tank for low-flow cycling.
- Replace the pump if grinding, overheating, or internal leaking continues.
Final Thoughts
A loud RV water pump does not automatically mean the pump is failing. In many cases, the motor’s normal vibration is simply being amplified by a hard mounting surface, rigid PEX, or loose plumbing inside the RV.
Start by checking the freshwater level, bleeding trapped air, cleaning the inlet strainer, and watching the pump while it runs. Then inspect the rubber mounts, mounting screws, pipe contact points, and flexible connections.
Rubber isolation mounts and short flexible hoses often produce the most noticeable improvement when vibration is spreading through the RV.
However, grinding, squealing, overheating, electrical smells, internal leaks, or severely reduced pressure can point to a worn or damaged pump. Turn the system off and arrange a repair or replacement when those warning signs appear.
Related FAQs
These common questions can help you distinguish normal pump behavior from mounting, plumbing, or mechanical problems.
How Loud Should an RV Water Pump Be?
An RV water pump normally produces a steady hum or pulsing sound whenever a faucet is open. It should not create violent banging, metallic grinding, sharp squealing, or severe cabinet vibration.
Why Does My RV Water Pump Make a Hammering Sound?
Hammering usually occurs when the pump cycles rapidly, rigid pipes transmit each pressure pulse, or loose water lines strike a nearby surface. Restricted aerators, low-flow faucet use, and incorrect pressure settings may also contribute.
Why Is My RV Water Pump Loud After Filling the Tank?
Air may have entered the inlet hose or plumbing lines while the tank was empty. Fill the tank, turn on the pump, and run each hot and cold fixture until the water flows smoothly.
Why Is My RV Water Pump Loud but the Water Pressure Is Low?
Low pressure combined with loud operation may indicate a clogged inlet strainer, low tank level, kinked hose, suction-side air leak, dirty fixture, weak battery voltage, or worn internal pump parts.
Why Does My RV Water Pump Pulse at Low Flow?
A fixed-speed pump may reach its shutoff pressure quickly when a faucet is barely open. It then turns off, senses another pressure drop, and starts again, creating a repetitive pulsing sound.
Will an Accumulator Tank Make My RV Water Pump Quieter?
An accumulator tank can reduce rapid cycling and smooth low-flow water delivery. It will not fix loose mounts, rattling PEX, a clogged strainer, air leaks, or damaged motor bearings.
Can I Put Foam Under My RV Water Pump?
You can use dense rubber or closed-cell vibration-isolation material beneath a secure mounting platform. Avoid soft foam that allows the pump to move excessively or blocks ventilation.
Should I Turn Off My RV Water Pump at Night?
You can turn the pump off at night to reduce noise and limit damage if a leak develops. Remember that fixtures will not operate normally from the freshwater tank until you switch the pump back on.
Why Does My RV Water Pump Run When No Faucet Is Open?
The plumbing system may be losing pressure through a dripping faucet, leaking toilet valve, loose fitting, low-point drain, faulty check valve, damaged diaphragm, or hidden water leak.
Can Low Battery Voltage Make an RV Water Pump Noisy?
Yes. Low voltage, poor grounding, corroded terminals, or undersized wiring can make the motor run slowly or unevenly. This may reduce water pressure and create rough buzzing or prolonged operation.
Why Is My RV Water Pump Louder at One Faucet?
That fixture may have a clogged aerator, restrictive valve, or loose pipe nearby. The sound may also be traveling through the PEX and being amplified by the cabinet around that faucet.
Why Does My RV Water Pump Sound Like It Is Growling?
Growling often points to restricted water entering the pump. Check the freshwater level, inlet strainer, suction hose, valve positions, and possible air leaks before assuming the motor is damaged.
Can a New RV Water Pump Still Be Loud?
Yes. A new pump can be loud when installed directly against thin plywood, connected to rigid PEX, mounted with overtightened screws, or positioned against a cabinet wall.
Is It Safe to Run an RV Water Pump Without Water?
Many pumps tolerate brief dry running, but you should not rely on that feature. Extended operation without water can cause overheating, premature wear, and damage to internal components.
Can I Adjust My RV Water Pump Pressure to Stop the Noise?
Some pumps have adjustable pressure-switch or bypass settings, but incorrect adjustments can prevent the pump from shutting off. Follow the exact manufacturer procedure or ask an RV technician to make the adjustment.

Michael Carter is an experienced RV traveler who focuses on practical outdoor trips across the States. He writes clear, step-by-step guides and realistic reviews based on real travel needs. His aim is to help RV and camper owners plan informed, simpler journeys with confidence.